To open the Threat Scanner Settings dialog box:
EITHER:
Windows XP, Vista, or 7 users:
Click START > PROGRAMS > EACCELERATION > STOPSIGN > THREAT SCANNER SETTINGS.
OR
Windows 8/8.1 users:
At the Start screen type STOP (the search box will appear as you type.) When the StopSign logos appear to your left or right of your screen, click on "THREAT SCANNER SETTINGS".
On the Threat Scanner Settings dialog box there are three areas where you can change how the Threat Scanner functions.
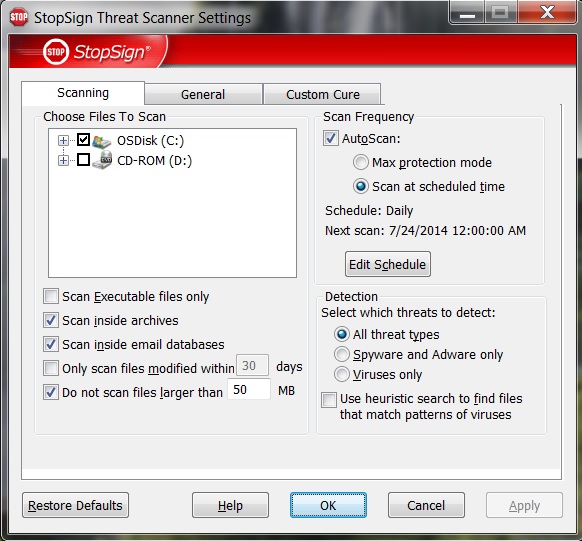
SCANNING Tab
Choosing files to scan
In the upper left part of the Scanning tab, you will see an area with check boxes. These check boxes allow you to choose what drives you wish to scan. If you click the "+" sign next to each drive, you can choose to scan only specific directories or to skip directories from being scanned. A checked box indicates the drive and or directory will be scanned.
Beneath the area where you choose the drives/directories to scan, you may choose what type and size of files should be scanned. Within these folders, you have many options to let you specify which files to scan.
Executable or nonexecutable files
Note: It is not recommended to scan executeable files only.Inside archives
Inside email databases
By the date files were last modified
By file size
NOTE: By default StopSign only scans files smaller than 50Mb. Most files larger than 50Mb are not virus threats. It aids in scanning efficiency to scan only smaller, more volatile files. It is possible to change this setting to include larger files, however, it will slow the scanning speed greatly.
Scan Frequency:
In the upper right side of the Scanning tab you can make changes to how often your scanner scans.
Max Protection mode Initiates a scan up to three times in a 24-hour period. Threat Scanner will sense when you have been away from your computer for over 10 minutes. If it has been 8 hours or more since the last scan, the threat scanner will automatically start a scan in the background. The automatic scan will pause when you start using your computer so it will not impact your computer's performance
Scan at a Scheduled Time Lets you choose the time, day and frequency of your automatic scans. To view and edit this schedule, click Edit Schedule. When Scan at a Scheduled Time is selected, it will enable the EDIT SCHEDULE button. The EDIT SCHEDULE button will launch a scanner wizard allowing you to choose daily, weekly, or monthly scheduling options. Customize the schedule to meet your needs.
NOTE: The Include Advanced Options check box when checked, allows you to choose what to do in the event the scanner cannot run at the scheduled time (such as, your computer is off). You may set the scanner to run either as soon as possible OR to wait until the next scheduled time. The Threat Scanner WILL NOT be able to run a scheduled scan if your computer is OFF or in SLEEP MODE at the time the scan is set to begin. The Advanced Options will also allow you to choose to run the scan only if the system has been idle for a specific amount of time and to pause the scan in the event the computer is no longer idle. Having checks in the two boxes under "Idle Time" may cause the auto-scan to take a very long time if there is little idle time to allow it to scan, or may prevent it from ever starting. But not having them checked may adversely affect the performance of a computer that is already on the slow side. We recommend leaving these boxes checked on a less than speedy computer.
Detection:
In the lower right corner of the Settings tab you can make changes to your Detection settings, letting you decide exactly what type of infections you would like to scan your computer for.
All Threat Types: Your computer will be scanned for all known threats. We recommend this highest level of protection, even though it will take longer to scan.
Spyware and Adware Only: Your computer will be scanned only for spyware. This is a good setting for a very quick scan that will detect only spyware, but you will have no protection against viruses.
Viruses Only: Your computer will be scanned only for viruses. This will slightly decrease the regular scan time, but you will have no protection against spyware.
Heuristic Search: This is an additional detection option that will search your computer for files that share patterns similar to known viruses. Heuristic Search can stop these new variants.
NOTE: Heuristic Searching searches for patterns in software code, therefore it may occasionally detect something that is not a virus (quarantining a file you may need to run a program). You might want to turn this on if your computer is having problems but no infections have been found. We do NOT recommend this as a normal setting.
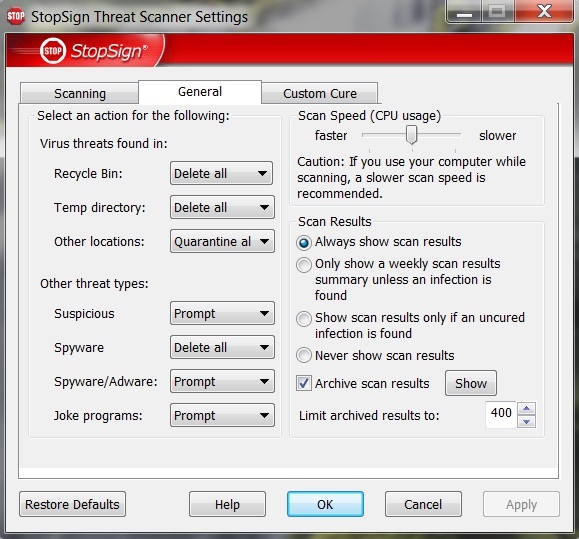
The left side of the General settings tab - allows you to designate what actions should be performed when threats are found during a scan. These actions are based on file locations and threat types.
File locations include:
Recycle Bin Recycled and deleted files and folders.
Temp directory Any temporary directory: internet, document, download, etc.
Other locations Any other location included in a normal scan.
Threat types include:
Suspicious Files Files that are similar to (but not exactly like) known viruses or other threats. Threat Scanner might find these types of infections if you have turned on Heuristic Searching.
Spyware cookies Cookies independently identified as spyware.
Spyware/Adware programs Applications, applets, or plug-ins independently identified as spyware.
Joke programs - Joke programs usually cause abnormal behavior or display fake error messages to trick users into believing that something has gone wrong with their systems. They do not infect files or replicate. Joke programs have no malicious intent and are not used in conjunction with other programs to run harmful routines.
These file locations and threat types provide options to:
Delete all Automatically delete any of these threats found.
Quarantine all Automatically quarantine (prevent the file from being opened) any threat found.
Ignore All This option applies to spyware programs and cookies. If you choose to ignore spyware, StopSign will not automatically clean it at the end of each scan.
Prompt Ask you about each threat. You can choose to delete, quarantine, or ignore each threat.
Scan speed setting
Scan Speed lets you choose how much of your computer's resources the scanner uses while performing a scan. If you plan to use your computer during the scan, we recommend you change the scan to run no faster than the default (medium speed). If, however, you do not use your computer during scans, you can set the scan to run faster.
Always show scan results
Only show a weekly scan results summary unless an infection is found
Show scan results only if an uncured infection is found (Recommended)
Never show scan results
Archive scan results - When this box is checked, StopSign will save your scan results for future evaluation. You can display archived scan results by clicking Show.
Limit archived results to: lets you set how many scan results can be stored in the archive.
CUSTOM CURE Tab
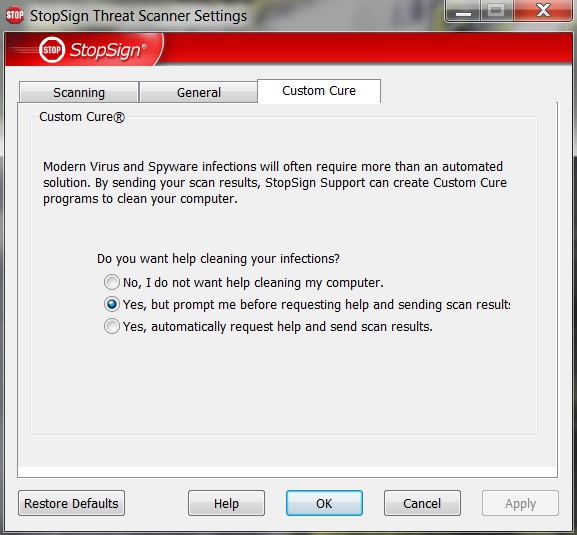
StopSign Custom Cures help you if you are ever infected with a new virus. If your computer has infections that cannot be automatically cured, you can choose to send your scan report to our technicians automatically. They will evaluate your results and, if needed, develop and send you a personalized cure to ensure that your computer is infection free.
Your privacy is important to us. The only information that is sent is what we need to create a custom cure for your computer. StopSign will NEVER share your information with any third party.
Options for requesting StopSign Custom Cures:
No, I do not want help cleaning my computer.
Yes, but prompt me before requesting help and sending scan results (DEFAULT)
Yes, automatically request help and send scan results.
For further assistance -
or
Additional user information may be found via the StopSign KNOWLEDGE BASE.